DATE WRITTEN: FEBRUARY 21, 2017
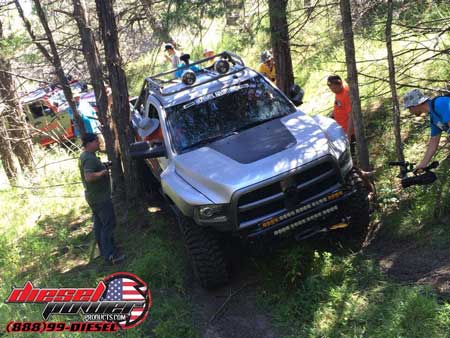
As many of you may know, we have an obsession for offroading. This obsession comes from our love of trucks, big tires, horsepower, and the great outdoors. As part of this obsession, we have been involved with Petersen’s 4 Wheel & Offroad Ultimate Adventure since 2012. Not only are we the title sponsor again for the upcoming 2017 Ultimate Adventure, but we have participated in each adventure that has us testing the limits of our vehicles in the most extreme environments, such as our trip through Death Valley last year. Some of you may remember Ultimate Adventure 2014 in which we built project Mjolnir. Mjolnir is a Cummins powered 2013 Ram 2500 regular cab long box that was treated to the full meal deal to kill it on the trail, and so it did. However, we learned a hard lesson with Mjolnir when wheeling with a bunch of Jeeps: wheelbase. While we were able to conquer every obstacle, this behemoth of a truck on 40” tires received plenty of body damage when squeezing through tight, tree ridden trails and required a little extra oomph in certain situations to avoid becoming high centered.
With Ultimate Adventure 2017 quickly approaching, we went to the drawing board on what our UA17 build would be. It quickly became evident that we wanted another Mjolnir, just not quite as much of her. We wanted a 2500 regular cab, short bed, and since no one builds this configuration from the factory, we knew we had one option: build it ourselves. Let us introduce you to Project Howitzer.
Howitzer, or Howie as we like to affectionately call him, started life as a brand new 2016 Ram 2500 featuring the mighty 6.7L Cummins power plant backed by a 68RFE six speed automatic transmission in a regular cab, long bed configuration. The ultimate goals for Howie were to reduce the overall wheelbase, dramatically improve the suspension for offroading, run 40” or larger tires, and roughly double the factory horsepower while maintaining full emissions compliance, all while keeping superb street manners. Sounds easy enough, right?
CUT IT! YEAH, IN HALF!
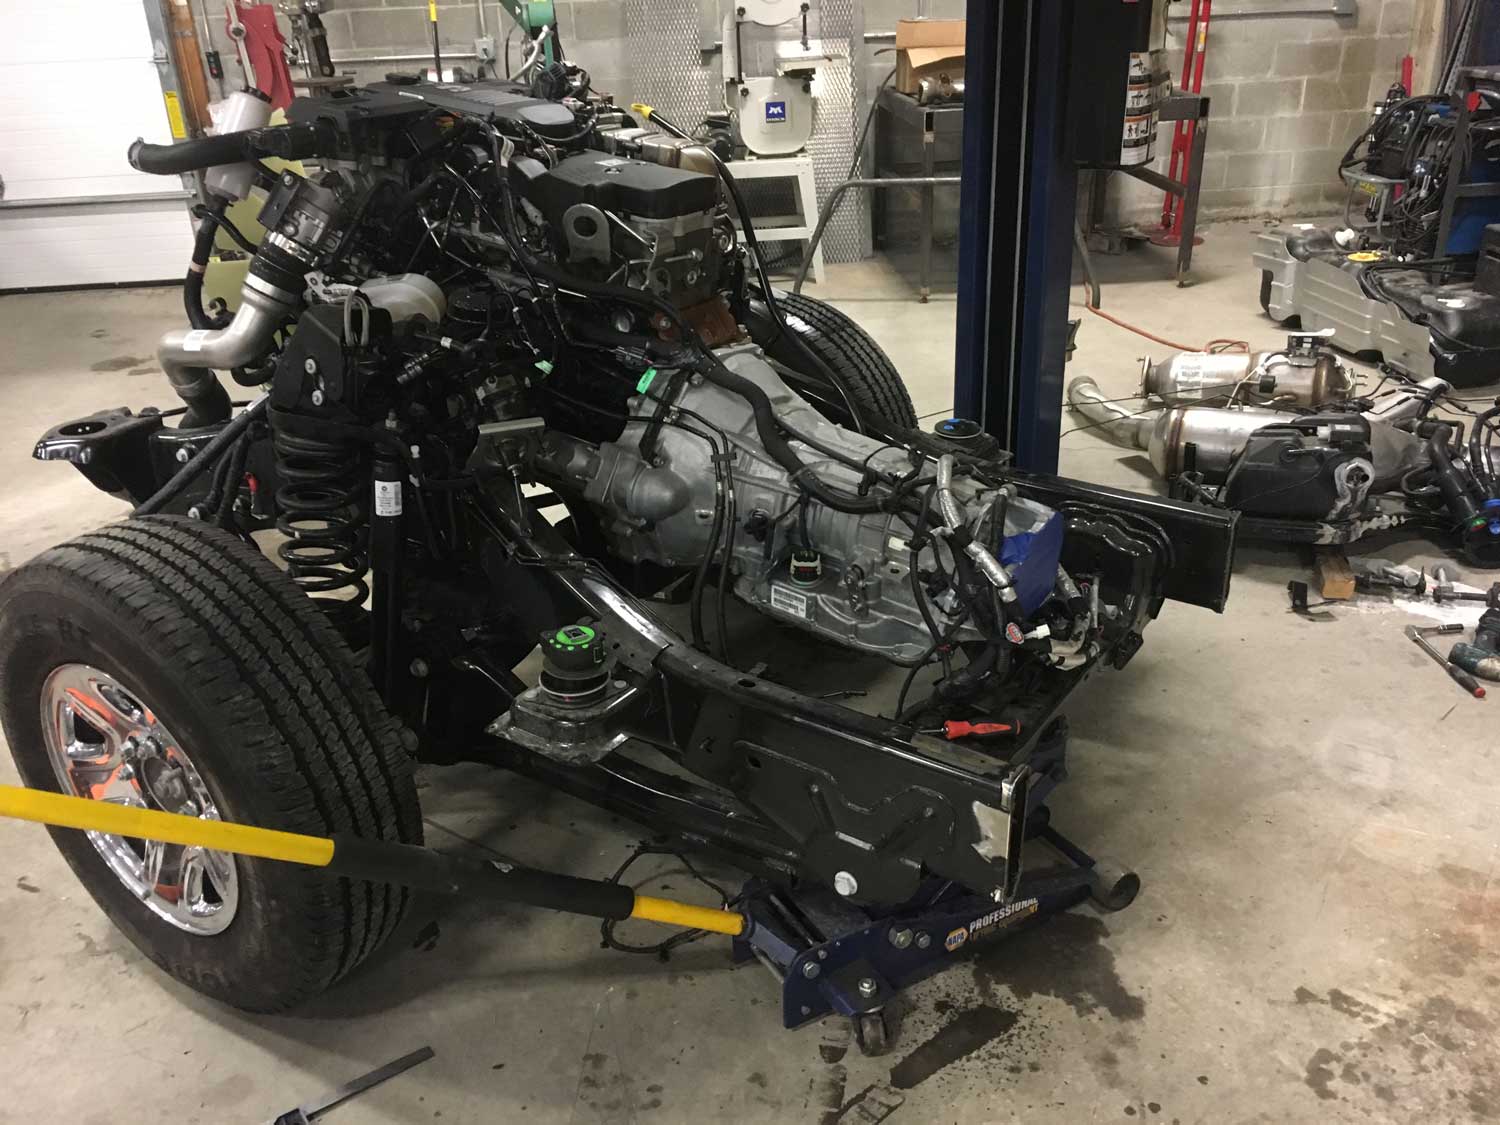
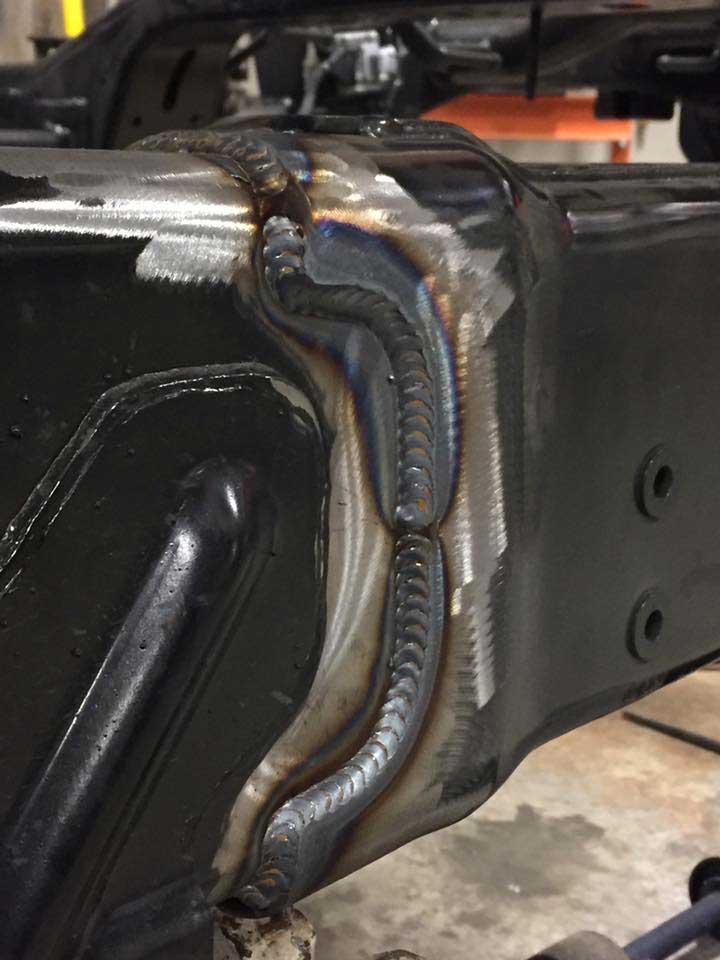
The first order of business was to put Howie on the chopping block, quite literally, and cut him in half. Have you ever seen that magic trick where the magician’s assistant is loaded into a box and the magician uses some type of cutting device to cut the assistant in half? Well, our device was a plasma torch, and done so right at the factory seam towards the back of the cab. With the frame now cut in half, we then took a frame from a crew cab, short bed, and performed the same treatment to give us the short bed section of frame we needed. With a fair amount of persuasion, the short bed frame was literally slid into the front half at the factory seam. While this may not be the easiest method of achieving our goal, it gave us the exact same result as if Ram were to build this application from the factory.
Now, to make our truck even cooler, we thought it would be perfect with a RamBox bed instead of a traditional bed to give us a ton of storage options. If you don’t know what a RamBox is, basically it’s a bed with built-in toolboxes in the side, taking up the typically unused areas around the wheel wells. Fortunately, we were able to find a RamBox bed in perfect condition locally and all of the mounting points with our new grafted frame lined up 100%. BOOM….sketchy part done!
ENGINE INTERNALS
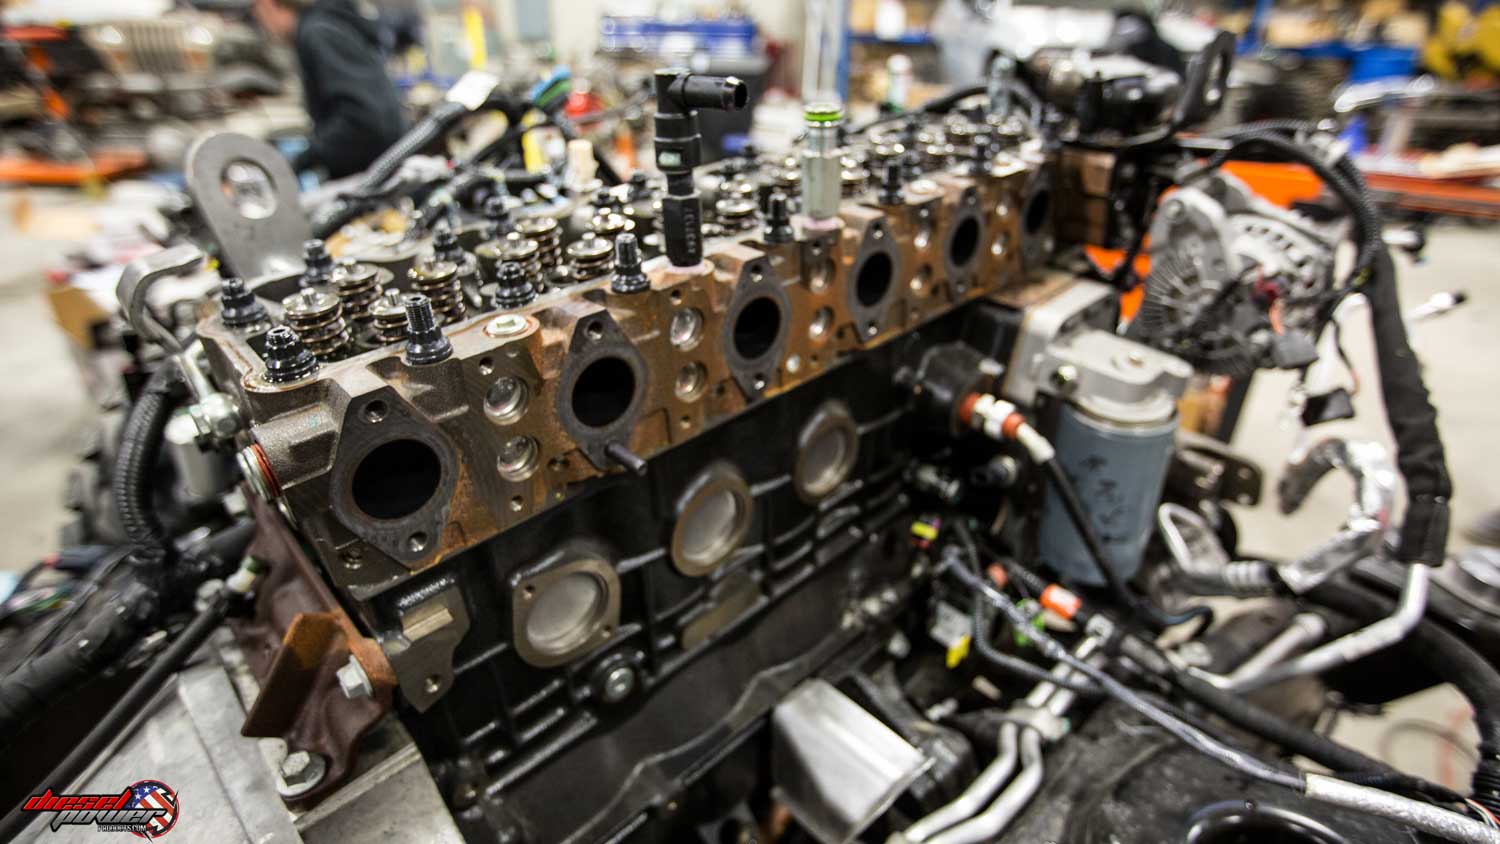
With the scariest portion of the build complete, we were now able to move onto the powertrain upgrades. As previously mentioned, we had a goal to roughly double the power output, which puts us in the sub-600 range, but with the twist of also maintaining complete emissions compliance. This means that the factory EGR and DPF systems would be retained, which requires a slightly different approach and a somewhat more in-depth parts list. But we have found that when properly built, you can absolutely achieve this result, it merely takes a different train of thought. With the cab off, accessing the engine was much simpler, and we started to dive in.
We started things out by yarding the factory camshaft in favor of a Hamilton Cams built 178-208 DPF Friendly Street Cam and a set of Hamilton Valve Springs to aid in the engine’s inhalation and exhalation. While we were in there we swapped out the stock, boring injectors for a set of balanced 90 horsepower injectors from our good friends over at Dynomite Diesel Products. One thing that really separates DDP from the majority of “injector builders” out there is they aren’t just punching out the injectors to create larger holes for additional fueling. They take into account spray angle, displacement, balance rate, return rate, and every other factor that is required to properly build a set of injectors. If you’re ready to up the ante on your horsepower goals, Dynomite has a huge selection of fueling upgrades. And to button it up, we slapped in some ARP head studs to prevent a blown head gasket down the road.
FUEL UPGRADES
To aid in fuel delivery for our higher flowing injectors, we looked to BD-Power for their direct replacement 12mm CP3 injection pump that will deliver 72% more fuel compared to the stock pump to ensure we don’t drain the rail no matter the circumstance. For this particular build, we appreciate the simplicity that a direct replacement would provide compared to that of a dual CP3 kit. And with our horsepower goals, the BD pump will have zero issues supplying sufficient amounts of fuel when commanded. To keep the CP3 fed, we upgraded the low pressure side with a FASS Titanium lift pump capable of flowing 150 gallons per hour. Not only will this pump outlast the stocker (and guaranteed for life to do so), but generates substantially more fuel volume, plus will protect our injectors by removing harmful contaminants and entrained air from the fuel. And for any of your Cummins owners out there, you’re probably familiar with what is known as “1/4 tank issues” that arise from traditional fuel pick up tubes in which the tube can no longer feed fuel once your tank is below roughly ¼ full. Because this truck would be seeing plenty of high angle obstacles, we opted for a FASS Sump with Integrated Suction Tube Kit that ensures you will get fuel down to the last drop. And finally to round out the fuel side of things, a Fleece Fuel Distribution Block was installed. These are really cool because not only does it act as a fuel filter delete since we no longer needed the stock filter with the use of the FASS Titanium, but its also a, you guessed it, fuel distribution block. You may be asking what the heck you would need a distribution block for. Well, the primary reason for most is that it gives you a clean way to run your feed and return lines on dual CP3 setups. Another benefit, though, is it gives you a means to mount your factory sensors back in place that were unplugged with the removal of the factory fuel filter. Since we are only running a single CP3, we didn’t need it for routing of the fuel lines, but it is a great way to maintain our factory WIF (Water In Fuel) sensor and any other auxiliary sensors.
LET IT BREATHE
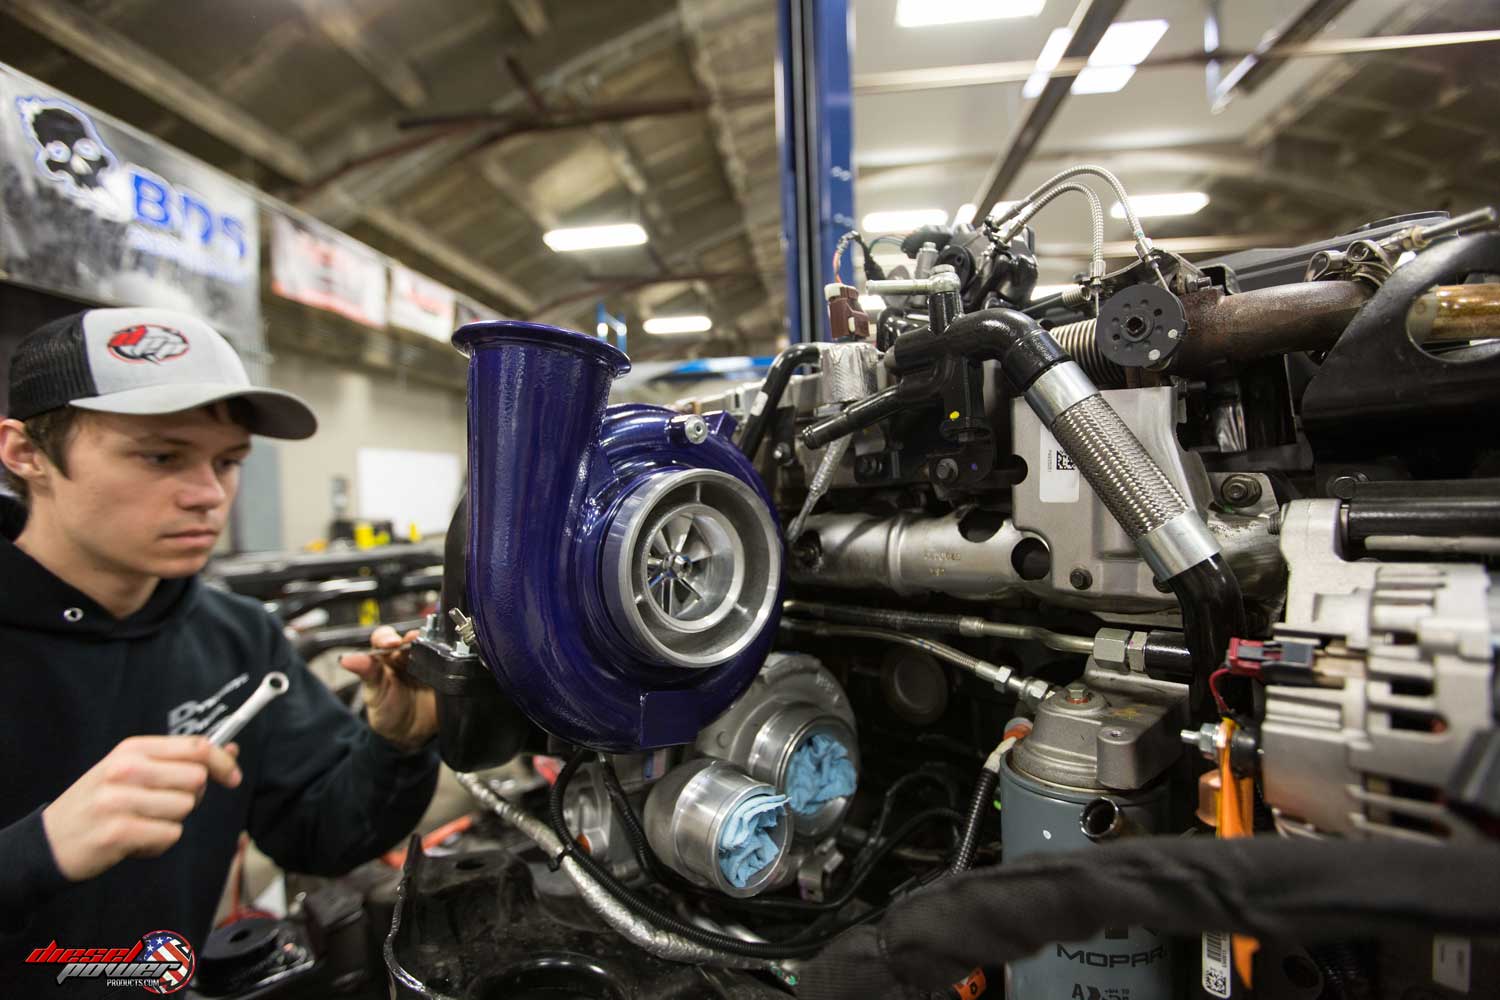
Now, with the fueling and engine upgrades complete, this bad boy needed some air! In order to stay on track with keeping all emissions components intact, we replaced our stock VGT with one of BD-Power’s HE351VE Screamer Turbos. The Screamer features a 64.5mm Ballistic Compressor Wheel and a larger 70mm turbine wheel for increased airflow, all while maintaining complete VGT functionality (including the factory exhaust brake). Due to the larger size and superior wheels, this bolt-in turbo is capable of supporting 690 horsepower. To complement the Screamer’s capabilities in moving air, we swapped out the stock exhaust manifold for a BD-Power 2 Piece Pulse Flow. This manifold features a larger inside diameter for additional airflow, removing yet another bottleneck, but is also a two piece design with a slip joint that will aid in preventing manifold cracks under high heat. And yes, you bolt the factory EGR cooler right back in place on top of the manifold.
Then, we went and did something. You know, its not really a party with only one turbo, so we added another one! And no better way than to upgrade with an ATS Aurora Plus 5000 Compound Turbo Kit that keeps the stock VGT (Variable Geometry Turbo) in place, but in our case, the BD Screamer. That’s right, this kit is designed to add an Aurora 5000 71mm turbo with your factory turbo (or upgraded VGT), meaning you get all of the benefits of a compound turbo kit, but still get to retain the VGT, and is completely emissions compliant. ATS is one of the forerunners in diesel performance, and they have been an advocate for retaining emissions equipment since day one. This is exemplified with the Aurora system, its truly an absolute work of art. The cast hot pipe found in this kit will not only outflow the traditional fabricated units everyone else uses, but it also just looks and fits a heck of a lot better, perfectly aligning with the stock exhaust downpipe. Further, the Aurora 5000 that takes center stage of this kit is not their standard 5000, it has been modified specifically for use in this compound kit. In order to appease the emissions system, its imperative to allow it to properly function in a similar fashion as to how it was originally engineered. This involves creating a certain amount of back pressure, but even more important heat. Heat is used during the continually running passive regeneration cycles this engine uses to essentially “de-soot” itself, and without heat, it will cause an ill effect of clogging the system prematurely. And this fact is what separates this kit from most others, and also one of the biggest hurdles when building power with emissions intact. The common train of thought is that you want to reduce your EGT’s (Exhaust Gas Temperatures) as much as possible, and while its still important on a 6.7L Cummins to reduce temperatures, it has to be done in a controlled manner that is parallel to that of the factory parameters.
To continue our endeavor of airflow upgrades, we now steered our attention to the drivers side of the engine. In case you’ve never seen the stock intake manifold and plenum once removed from the engine, we’ll save you the boring details, its an atrocity. We shouldn’t say that, the manifold isn’t so bad, it definitely has room for improvement, but its not terrible. But the intake plenum is one of the worst bottlenecks on any diesel engine ever produced. Specifically, the plenum is the long plate that runs the length of the head that the manifolds bolts down to. The area that is intended to flow cool, dense air after leaving the intercooler instead is a super restrictive grid heater design. In general, grid heaters aren’t restrictive, but the way this was designed puts two large tabs of metal right into the air stream, causing a ton of turbulence right where you don’t want it. To rectify this issue, we exchanged the stock plenum with a higher flowing, non-grid heater BD-Power Open Grid Intake Plenum. To maximize the final air charge, an aFe BladeRunner intake manifold featuring their exclusive MDV (Multiple Directional Vane) technology was bolted down. Again, this piece allows you to retain the factory EGR valve, but is designed substantially better than the stock piece with a larger inside diameter and integrated grooves, or vanes, that speed up the air charge. Just remember, airflow equates to horsepower, and every bit counts!
FINE "TUNE" IT
Phew, with all of the engine hard parts installed, a little ECM tuning from our brothers from another mother at ATS assisted in dialing in the calibrations perfectly. While its essential to pick the right components in your build, its equally important, if not more so, to get the right tuning to maximize the benefits and ensure everything is running optimally. And we opted to utilize ATS’ custom tuning performed via EFILive due to their extensive knowledge of performance tuning with the emissions systems left intact. This will net us the biggest power gains overall, but not over fuel the engine, again, causing the EGR and DPF to clog prematurely. All of this is an absolute balancing act of ramping up the performance, but counter balancing at the same time.
GETTING THE POWER TO THE GROUND
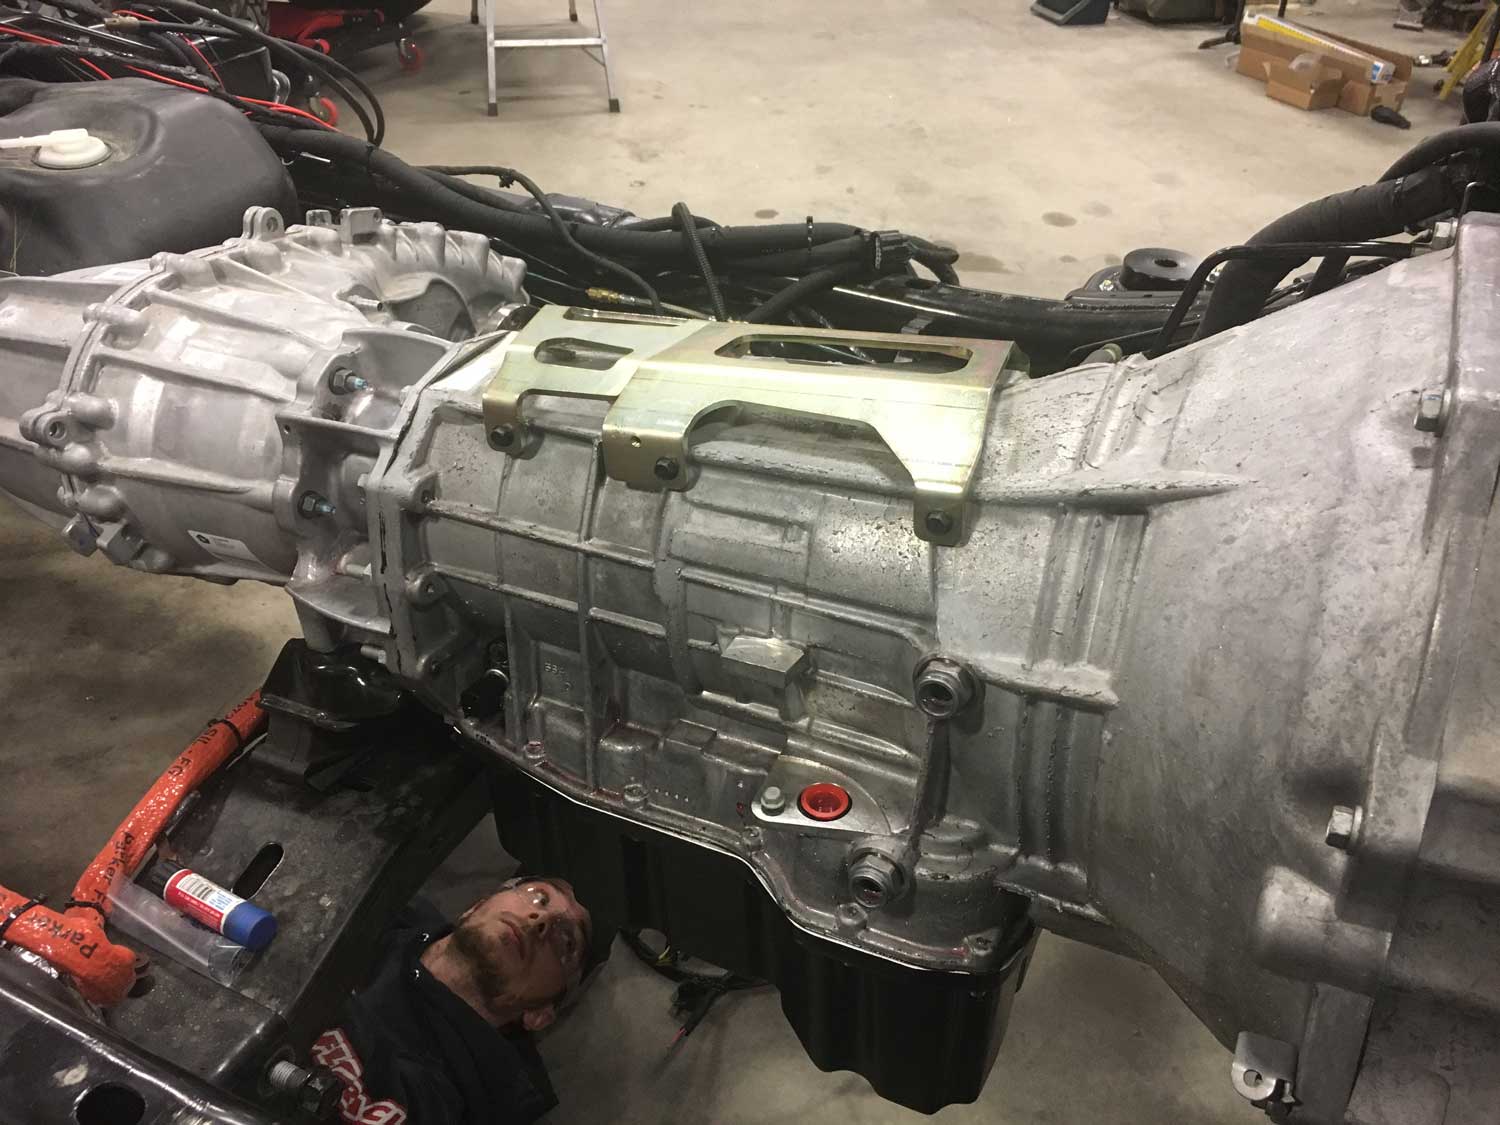
In order to get all of this new power to the ground, we now turned our attention to the transmission. Since this transmission was brand new, like 50 miles on it brand new, we decided to not replace the entire transmission, merely upgrade all of the major hard parts. On trucks with higher miles, we would always recommend a full build, but in this case, we know that our build list will have no problem supporting our power goals. The most obvious of upgrades comes from a BD-Power Triple Disc Enhanced Stall Torque Converter. This converter nets three times the holding power of the stock unit and has 95% fluid coupling to engine RPM transfer, compared to 75% of the original unit. When upgrading to a stronger converter, its imperative to also upgrade at least the input shaft and flex plate to avoid either of these shearing in half, and so we did! In short, since the converter now has less slip, that torque has to go somewhere, and the shaft and flex plate are next in line. A BD-Power Black FleX-Plate and ATS Billet Input Shaft were used to complement the converter. Neither of these need much explanation, simply put, they’re strong and don’t break. Now, one of the biggest weaknesses of the 68RFE transmission is its case, they crack! And this problem only worsens as more stress is put on the transmission, and you can bet this particular unit is going to see a LOT of stress. Some have taken the route of swapping in 47 or 48RE transmissions, and even Ford 4R100 conversions, but we opted instead to add rigidity with the addition of an ATS Case Brace and a BD-Power Deep Sump Transmission Pan. Yes, that’s right, a transmission pan does add rigidity because the cast aluminum construction has less deflection than the stamped steel construction of a stock pan. And now to polish off our transmission, it would need some custom TCM (Transmission Control Module) tuning from PPEI. With all of these upgrades done to the transmission, just as with the engine upgrades, you really need to update the computer to make electronic adjustments to how everything operates, and the guys at PPEI are pros at this. One of the things they do in the TCM tuning is bump up the demanded pressure to deliver firmer shifts, instead of those squishy factory shifts. This is done easily enough in the tuning, but to get the full 175+ psi line pressure, you need to upgrade the separator plates in the valve body. Here again, BD-Power had us covered with what they call their ProTect68 Pressure Control Kit.
BEEF, ITS WHATS FOR DINNER
Alright, so now we’ve got the engine and tranny done, what’s next? As we mentioned earlier, this truck would be running 40” or larger tires, and specifically, those tires are 42” x 14.50” x 17” Maxxis Trepador Street Compounds featuring a bias ply construction wrapped around beadlocked KMC Machette Krawls with 3.5” of backspacing. If that sounds like a big tire to you, good, it is. With all that tire means that axle upgrades are no longer optional, they are required. We have been using and selling gear packages from Nitro Gear & Axle for years now, and they’ve never let us down, so they hooked us up with a 5.13 ratio set of front and rear gears to make sure we weren’t doing 100 MPH in second gear. While in the axle housings, we are also upgrading with front and rear ARB Air Lockers. These are awesome because unlike traditional lockers, you control when you want to be locked up for ultimate traction and unlocked for street driving. They are operated by an onboard compressor, and no better match than an ARB Twin Air . With the Twin Air, you can control both lockers and have full on board air for inflating tires, running air tools, or whatever else you need. The last piece of the puzzle (at least for now) in the axle department is the addition of a Dynatrac Free Spin Kit with their upgraded DynaLoc hubs used in conjunction with a set of RCV axles designed specifically for use with the Free Spin Kit. While many use this kit to eliminate drag in two wheel drive mode on their Rams to increase mileage and reduce wear, we have a slightly different reasoning. First, these parts are way stronger than the stock American Axle components, and secondly, the Free Spin Kit eliminates the weak inner axle disconnect and u-joint with the addition of the RCV axles. With this combination, we ditch the failure prone u-joints in favor of CV joints, plus get the strength of RCV axles that are far superior to their AAM counterparts. Besides the sheer difference in strength between a traditional U-joint and a CV-joint, CV’s also have the added benefit that they will not have that bucking sensation in low range gear when turning that U-joints are notorious for. And with 42” tires, you need to eliminate any weak points in the axles given the opportunity.
And that’s where ol’ Howie resides as this is being written, but with continuous work being done, that will change in the next five minutes, as we still have plenty left to do in preparation for UA17. Make sure to check back often as progress is made on the suspension, body, bumpers, lighting, interior, and so much more. We can’t wait to see how this beast runs down the trail and to show, yet again, that diesels truly do dominate in everything.

 ARP 247-4202 If you are running in excess of 45psi of boost on your 24V or Common Rail Dodge Cummins you run a real risk of stretching your stock head bolts causing head gasket failure. ARP diesel head studs are good insurance against head gasket failure. Don't ruin your day at the track or dyno. Get it done! It is for good reason that virtually every top professional engine builder relies on ARP Pro Series head studs for their all-out competition powerplants. BD-Power Deep Sump Transmission Pan 07.5-22 Dodge 6.7L Cummins 68RFE 1061525 BD-1061525 30.00
  BD-Power 1061525 Diesel Power Products carries the BD-Power Deep Sump Transmission Pan for 07.5-22 6.7L Dodge Cummins 68RFE. BD-Power Black FleX-Plate 07.5-18 Dodge 6.7L Cummins with 68RFE BD-1041221 20.00
  BD-Power 1041221 Diesel Power Products carries the BD-Power Black FleX-Plate for 07.5-18 6.7L Dodge Cummins with 68RFE 1041220 BD ProForce 3D Converter 07.5-18 Ram 6.7L Cummins 68RFE BD-1071220X-main 0.00
  BD-Power 1071220X Get all of your engine's power to the ground with a TorqueForce Torque Converter. Hamilton 103 Pound Valve Spring Set 98.5-18 Dodge Ram 5.9L / 6.7L Cummins HAM-07-S-003 3.00
  Hamilton Cams 07-S-003 Diesel Power Products carries the Hamilton 24 Valve Springs for 98.5-18 Cummins FASS Fuel Sump with Bulkhead Suction Tube Kit DDP-STK-5500 5.00
  FASS Fuel Systems STK5500 This is the most advanced, most efficient way of getting fuel from your tank to your pump to ever hit the diesel market! FASS delivers their sump/suction tube kit that takes the best of BOTH worlds! First of all, this utilizes FASS' proprietary head unit design for drawing and returning fuel out of the tank. Dynatrac Free Spin Heavy Duty Front Hub Conversion Kit 10-19 Dodge Ram 2500 / 3500 DYN-CR60-3X1104-Main 0.00
  Dynatrac CR60-3X1104-H
  ARB CKMTA12 The ARB Twin Air Heavy Duty Compressor is a life saver by delivering available air on tap whenever you need it. ARB Air Locker AAM 11.5" 14-Bolt ARB-RD139 57.00
  ARB RD139 No more compromising with your AAM 11.5" equipped truck, the ARB Air Locker provides the ultimate in traction for off-road use, but delivers the streetability of an open differential. ARB Air Locker AAM 9.25" Front ARB-RD197-main 30.00
  BD-Power 1041564 Replace your factory intake plenum with a BD Open Grid Intake Plenum for superior flow! ATS 3049102326 Billet Input Shaft 07.5-22 Dodge 6.7L Cummins 68RFE ATS-3049102326 7.00
  ATS Diesel Performance 304-910-2326 Don't let a broken input shaft destroy your entire 68RFE transmission, upgrade it to an ATS Billet Input Shaft!