
Just about every diesel engine will have mechanical problems at one time or another, so to keep your older truck on the road, you’ll have to either trust someone else to correctly handle the job whenever a failure does occur, or you can save a few bucks and diagnose and repair the problem on your own. I am a huge advocate of DIY repair and modification, but sometimes you do need a little extra knowledge to help point you in the right direction. Some parts can be difficult to properly diagnose, and there’s nothing worse than replacing an expensive part, only to find out it wasn’t the cause of the problem. Today we’re focusing on the Achilles heel of the LML Duramax, the CP4 injection pump.
GM introduced the Duramax engine in their 2001 model year trucks, and since then, it’s been a 6.6-liter 32-valve common rail injected diesel V8. Much has changed since the original LB7 variant, and it seems that every few years they released a newer model with slight improvements in power and efficiency. After the LB7 was the LLY, the LBZ, and the LMM, and one thing they had in common was they all used the Bosch CP3 injection pump. It’s a piston style pump that’s driven by the cam gear, and from 2001 to 2010, the CP3 saw many miles of reliable service.

In 2011, the LML Duramax was released, and it shared many similarities with its older brothers, but this was the first time the CP3 was no longer used. Instead, a newer injection pump (still made by Bosch) was installed, and it was the cause of quite a few headaches. The CP4.2 was made from lighter aluminum instead of cast iron, and many people suspect cost savings was the primary reason for the switch to the new pump, but whatever the reason, the new pump was trouble.
Problems With the CP4
Soon after the CP4 was introduced, reports of failing injection pumps began to surface, and as time went on and more trucks approached the 100,000-mile mark, it became apparent something was not quite right. You could be driving your truck along and everything seems fine, then suddenly you lose power, the engine starts to sputter, and sometimes it will die and not be able to fire back up. Many GM trucks (and the 6.7 Powerstroke as well) had this happen under warranty, and when it did, the dealer would replace not only the injection pump, but also the injectors, rails, high pressure lines, fuel filter, and do a whole lot of cleaning. While this may sound extreme for a simple pump failure, the reason why a complete fuel system overhaul is necessary is because as the CP4 dies, its final act is to send a healthy dose of metal shavings and shrapnel into the fuel system. Parts like the injectors and fuel rail will be damaged as metal shavings are forced in under high pressure, and even if you tried to clean ‘em out, there would still be a small amount of metal left inside which would continue to cause damage, so a complete replacement is the best (and only) route after a CP4 failure.
Preventing a CP4 Failure
Before we discuss fixing the problem, it is worth understanding what goes wrong, because if we know the cause of the problem, we can address it before its too late. The root cause of a CP4 failure is lack of lubrication. It’s rumored that Bosch designed the CP4 to work with European diesel fuel with a higher sulfur content, so when its run with Ultra-Low Sulfur Fuel available in North America, it doesn’t get adequate lubrication. There are many tight tolerance parts inside the injection pump, and the slightest bit of contamination or wear can start a snowball effect which will ultimately lead to the demise of your fuel system.
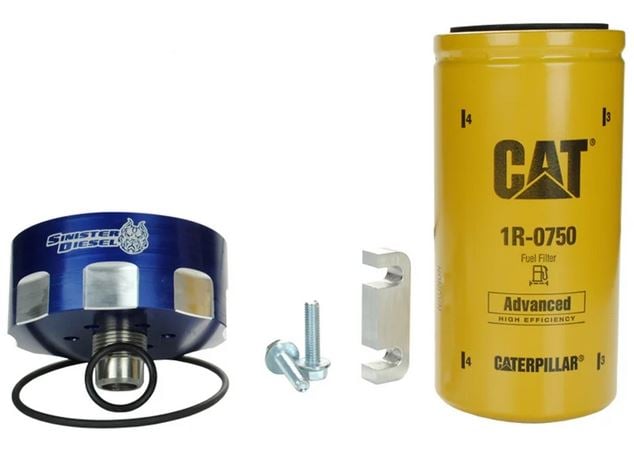
The first thing you can do to prevent damage is change your fuel filter regularly. The stock Duramax filter is a spin on style which can easily be replaced in under 15 minutes, so there’s no excuse not to change it on time. 10,000-mile intervals may seem a bit excessive, but if it saves your fuel system, it’s worth it. Second, use some form of a fuel additive that improves the lubricity of your diesel each time you fuel up. F-Bomb Diesel Fuel Additive mixes in at a rate of 1 oz per 30 gallons of fuel, and it offers many benefits to any diesel engine, like a higher cetane rating, increased fuel economy, a cleaner fuel system, reduced emissions output, and best of all, it provides additional lubrication for your pump and injectors.
Because the injection pump is pulling double duty by bringing fuel to the engine and then pressurizing it, a lot of stress is placed on the CP4. By installing an aftermarket lift pump like a Fleece Powerflo in-tank pump assembly, you alleviate stress on the injection pump by feeding it with a steady supply of low-pressure fuel. This can extend the life of your injection pump as well as give an increase in horsepower, if your CP4 was dropping rail pressure under high power situations. You could even take this concept one step further and install a FASS or Airdog lift pump which will supply the CP4 with plenty of fuel, but will also remove any dirt, air, or water that might be present in your fuel.
Diagnosing a Failed CP4
Unfortunately, a CP4 doesn’t give a lot of warning signs before it ultimately fails, and in some cases, there will only be a few minutes of symptoms before the truck shuts off and leaves you on the side of the road waiting for a tow truck. Once you’ve got it back to your shop, there are a few things you can check to make sure it is indeed a CP4 at fault before spending the money on a new fuel system. The first thing you need to verify on a no-start condition is fuel pressure, so hook up a scan tool and check for any DTC codes. There are a few that might pop up, including a P0087 which indicates low fuel rail pressure. If there are no DTC codes currently set, log Fuel Rail Pressure with the scan tool while you crank the engine over. You should see at least 1,500 psi of fuel pressure while cranking, so if you have more than that, your no-start condition might be caused elsewhere. Likely however, you’ll have much less than 1,500 psi, so we need to rule out a few more obvious things before pulling the trigger on a new fuel system. First, ensure the tank has plenty of fuel in it (LML era trucks have been known to have a faulty fuel level sending unit) and next make sure the fuel filter is not clogged. Finally, do a visual check for kinked fuel supply lines. Between the driver’s side valve cover and brake booster will be a short section of flexible fuel line that connects the engine to the hard lines along the frame, and that flex line is known to collapse under the suction from the injection pump, and when it does, it can cut off the fuel supply to the pump.
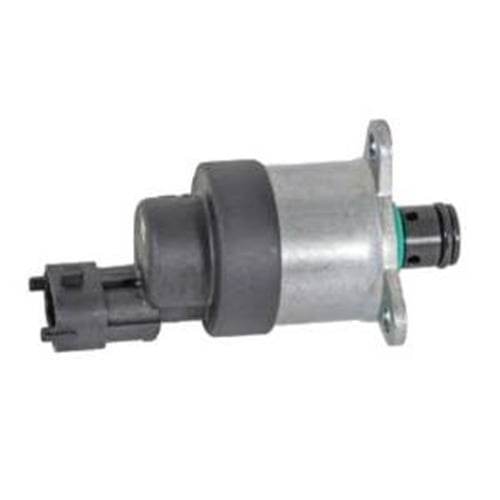
Once you’ve ruled out all the simple issues, the next job is to remove the FCA. This is commonly known as the fuel pressure regulator, but its technically called the Fuel Control Actuator. There is a small metal screen on the end of it which will be covered in metal shavings if the CP4 has failed, so we need to take a look. There are a few things to move out of the way before you can access the FCA, including the AC Compressor, but once you’ve gained access, you can unbolt the FCA with two T25 Torx screws, and carefully inspect the end. If you see any metal shavings or debris, that’s a positive indicator that you’ve got a long job ahead of you, and you need to order a complete fuel system.
Replacement Parts
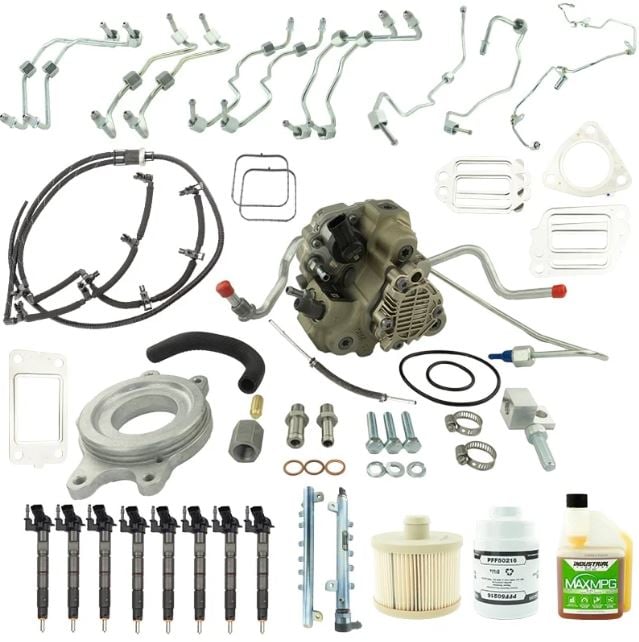
Now that you know it’s time to order parts, the question is what do you need to buy? You do have a few options as always, and the logical first choice would be to replace everything with OEM parts. You can piece together a kit with a reman or brand-new Bosch CP4 pump and replacement stock injectors, but you’ll still be missing about a dozen other small parts which you’ll need to replace. The simplest route here is to order an Industrial Injection Disaster Kit. This will come with EVERYTHING you need to get your LML back on the road the first time. Of course, it comes with the injection pump and injectors, but you also get two new fuel rails with sensors, all high-pressure steel lines, and a fuel filter service kit. The Industrial Injection kit can come with a stock CP4 injection pump, but a smart move would be to upgrade their Disaster Kit that comes with the more reliable CP3. This kit comes with everything necessary to make the conversion without requiring any tuning. Of course, if you’re building a hot rod truck, this would also be the perfect opportunity to install a slightly larger fuel injector, or a higher flow injection pump if your performance needs dictate that.
Removing a CP4
There’s no beating around the bush on this project, an LML fuel system replacement is no small task. There are a ton of parts you need to remove and replace, so if it’s your first time, don’t expect it to be a simple one-day job. In terms of component location, the CP4 is mounted in the valley of the engine in front of the Y bridge, the fuel rails are mounted along the inside edge of the cylinder head, and the injectors are mounted in the top of the cylinder head through the valve covers. With a general understanding of where everything is, it’s time to jump right in and get to it. As always, the first thing you should do is disconnect both batteries.
Removing the CP4 pump itself may be the most time-consuming part of the whole process. It is buried quite deep in the valley of the engine, and to gain access, you must remove the air intake system including the turbo inlet and air filter, and the upper intake elbow. The LML uses two EGR coolers which form an “L” shape, and both need to come out since they cover everything you’re trying to reach. Finally, the intake Y bridge can come out. Out front, the serpentine belt is removed, the cooling fan and shroud come off, the AC compressor can be unbolted and moved aside, and the alternator is removed. Now you should have a visual on the CP4 pump, but we’re not out of the woods just yet. Next, you need to remove all the fuel lines that connect to the CP4, and there will be a low-pressure supply and return, a feed for the 9th injector, and two high pressure steel lines feeding the fuel rails, along with two electrical connections. Four bolts hold the CP4 injection pump to the block, and they are accessed from the front side of the engine, just above the timing cover. To help dislodge the large O-ring seal and any rust that’s holding the CP4 in place, remove the upper oil fill tube and use a small pry bar and push against the nut on the end of the pump shaft. With a little wiggling back and forth, the injection pump can be removed from the valley, but be sure not to drop any hardware into the opening, since they could fall directly into the cam gear and cause catastrophic damage on fire up.
With the CP4 out of the engine, you’re about halfway done with tear down. Next, you need to remove everything from the top of the valve covers to gain access to the injectors. There will be several clips and brackets that mount other components, a fuel return hose, and when you have access, you can remove all eight injector feed tubes that connect to the rail. Next, remove the hold down bolts and pull the injectors from the cylinder head, but don’t discard them if you bought reman injectors, since you’ll want to send them in to get your core charge back. Remove the two fuel rails from the cylinder heads, and that pretty much wraps up all the parts you’ll need to remove from the engine.
Toward the back of the truck, you’ll want to remove the fuel tank (hopefully it’s close to empty first) or at least remove the bed from the truck so you can reach inside. Because there may be metal shavings that were pushed back to the tank, you should thoroughly inspect and clean the inside. Also, use some form of solvent or diesel fuel to flush the lines that connect the tank to the engine. The new fuel filter will catch most small contaminants before they make it to the injection pump, but it’s better to not take any chances. Basically, if fuel passes through it, it can be contaminated, and it must be cleaned or replaced to prevent collateral damage when you fire up the truck for the first time.
Assembly
While we did breeze through the disassembly process, it is important to reassemble everything in the reverse of removal because there are so many hoses, pipes, wires, and tubes that all fit together in a very specific order. For the most part, assembly is straightforward, but there are a few “gotchas” you’ll want to look out for. First, before you install the new injectors, make sure all the original copper washers came out of the cylinder head. If you double stack a washer, it could lead to sealing issues. Second, if you are using a new CP4 injection pump, you must time the pump. This is accomplished by removing the access plug on the front of the timing cover and lining up the dot on the CP4 gear with the dot on the cam gear as you install it. This will ensure that the injection pump is operating at its peak pressure whenever the injectors are opened. If you are installing a CP3 retrofit kit, then you can skip this step, since a CP3 does not need to be timed.
Take A Breath, And Turn the Key
When you’re done with the job, chances are you’ll swear to yourself that you will never tackle a project like that again, but the satisfaction of hearing your LML Duramax purr with a silky smooth idle will make it all worth it. Depending on where you go, a failed CP4 could cost you between $5,000 and $10,000 at a shop, so the real benefit of doing it yourself is the huge savings in labor costs. Sure, its gonna take some time, and you’ll probably learn a few new four-letter words, but nothing good ever comes easy (or at least that’s what the old timers say).
Dang…. l read all this too late 🥴
things that GM dont tell you about !
” were not just talking coconut milk “
Does the Industrial Injection disaster kit come with all the seals gaskets and hoses necessary to complete the retrofit with the CP3 disaster kit