Written By: Lawrence “LT” Tolman
My favorite thing about diesel trucks is their ability to do so many different things at the same time. Whether its hauling, commuting, off-roading, or taking the family to the lake, a diesel can do it all. Each one of those uses are right in line with what the manufacturers intended, but my very favorite thing is their ability to make tons of extra horsepower and torque over stock. It doesn’t matter if you love Ford, GM, or Dodge, you can modify each to make as much power as you want. We’re kicking off a series which walks through the steps of building horsepower, and rather than a simple parts list, we’ll treat this more like a roadmap to a multistage build. Most owners alter their trucks over a period of time, and the order in which you install upgrades is important, because if you modify out of order you can hurt the drivability and utility of the pickup, or even cause major mechanical damage. To kick things off, we’ll be discussing the Duramax platform, but not just one specific version of the engine, sine the parts specified are somewhat interchangeable. Our discussion will apply to everything from the 2001 LB7 to the LML which ended with the 2016 model year. Since the 2017+ L5P is so new and there isn’t a ton of aftermarket support, it will be excluded from our discussion.
Depending on what year Duramax you start with, your truck could have somewhere between 235 and 397 horsepower at the flywheel, and if you were to put the truck on a chassis dyno in its bone stock condition, you’d find if puts down (on average) 80 horsepower less at the rear wheels, since so much energy is soaked up by the Allison automatic and beefy AAM 11.5” full floating rear axle. For round numbers and the sake of conversation, let’s assume we’re starting with an almost stock LBZ truck that puts down about 300 horsepower to the wheels, and that we have a final power goal somewhere around the limit of the stock rotating assembly, since the pistons and rods are the weak link. Depending on who you ask, you’ll want to stop in the ballpark of six to seven hundred horsepower, which means to get there, you’ll need to add three or four hundred more horsepower. While you could just drop your rig off at a shop with a blank check and ask for the whole enchilada at once, most of us simply cannot afford that luxury. I usually like to break down a build into stages which can be completed in somewhat affordable chunks, but more importantly in such a way which won’t negatively impact the driving experience. When talking about a diesel build, break up the conversation into four distinct stages.
Stage One: +130hp Over Stock, $1,700 Budget
The OE manufacturers will design a vehicle to be comfortable and quiet and rarely give any thoughts to extracting every last bit of horsepower, so often there are compromises in airflow in exchange for lowered NVH (noise, vibration & harshness). On an air intake system for example, extra care is taken to ensure no engine induction noise is heard inside the cabin, so resonators are included in the tubing, and often look like odd plastic growths, plus the diameter of the tubing is carefully determined. While this makes for a nice quiet engine, it does no favors for moving large amounts of air into the turbocharger, and the same concept applies to the exhaust. So, stage one begins by addressing both the induction and exhaust.
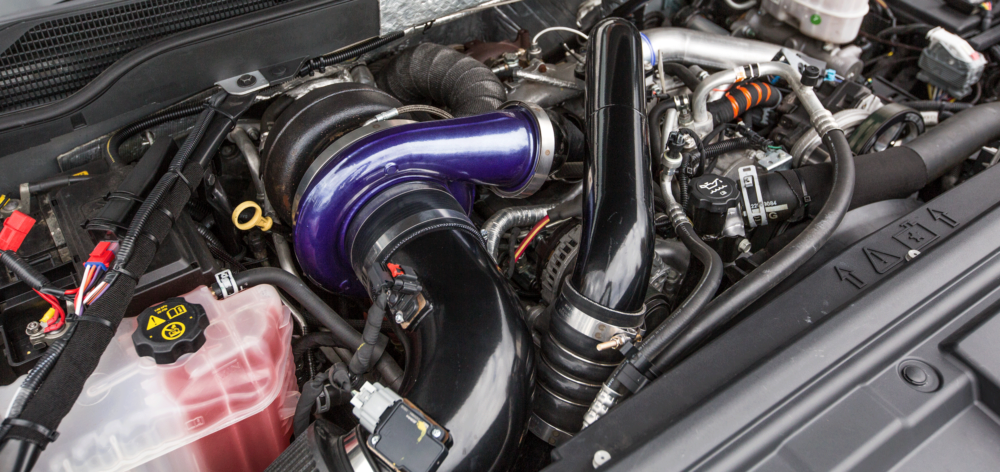
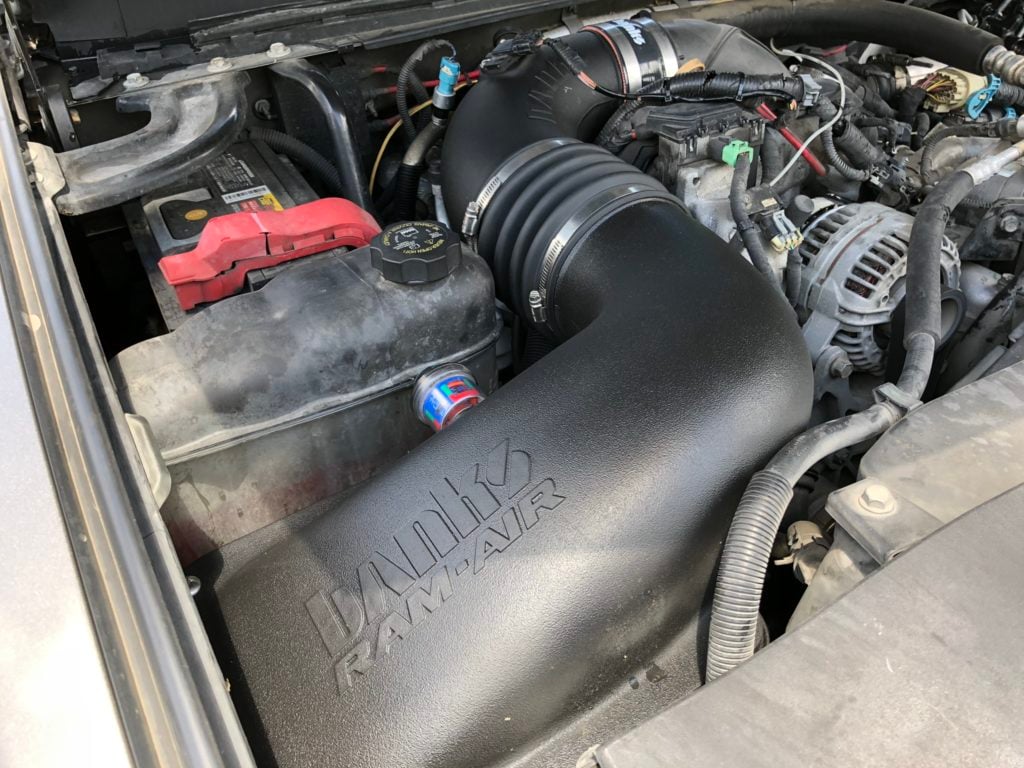
Most Duramax trucks came with a 3-1/2” exhaust, and while there are plenty of four-inch systems on the aftermarket, if you plan on reaching 700 horsepower or more, you might as well jump in the deep end and bolt on a five-inch down pipe back system from the get go. There’s no real disadvantage to using a larger diameter exhaust at a lower power level, and the bass notes of the exhaust are an added benefit. An MBRP 5” aluminized downpipe back system is affordable at less than $500 and will free up any restrictions from the tiny factory 3.5” pipe, plus it will lower EGTs considerably. On the inlet side of things, your main goal is to lessen restriction, but don’t grab one of those “filter on a tube” intakes. Instead, you’ll want to install a filter which is sealed inside a box, and draws fresh air from the outside atmosphere, not the hot engine bay: a Banks Power Ram intake kit is what fits the bill.
With the first airflow upgrades taken care of, the next step is tuning, which will unleash the majority of power for the first stage. By selecting an experienced tuner like Calibrated Power/Duramax Tuner, you know you are getting the best for your engine. Their Jack series tuning is optimized for trucks with stock transmissions and simple bolt on upgrades, and when switched to level 5 with a DSP switch, you’ll have about 130 horsepower over stock at your disposal as well as lower levels for daily driving, towing, and even a stock level for when the wife wants to borrow the truck. The programming also optimizes the factory torque curve which makes in-town driving a blast, and fuel efficiency is increased as well. But just because it’s a great starting point doesn’t mean you have to stop there…
Stage Two: +250hp Over Stock, $5,000 Budget
With the basics taken care of, it’s time to get your hands dirty and dive into the engine for a few more upgrades. For stage two, the goal becomes supporting power, and helping the engine run cooler while producing more power than stock; remember, more power equals more heat, and unless you manage that heat, you’ll have a pile of melted parts instead of a fast truck. To help cool things off, you need more air running through the engine, so the parts for stage two mostly revolve around creating efficiency in the turbocharging system. Basically, we need to touch every part the air travels through, and to avoid buying parts twice, everything we’re selecting will work great for an intermediate build, but also when we push the envelope further in stage three.
Exhausted:
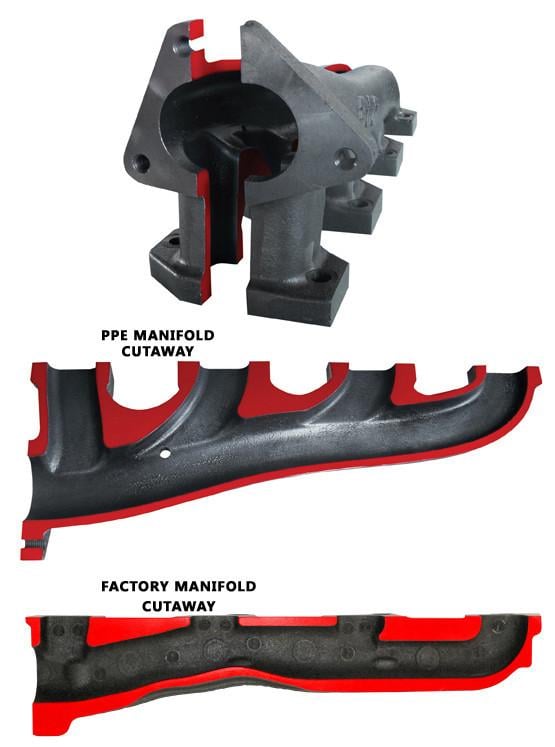
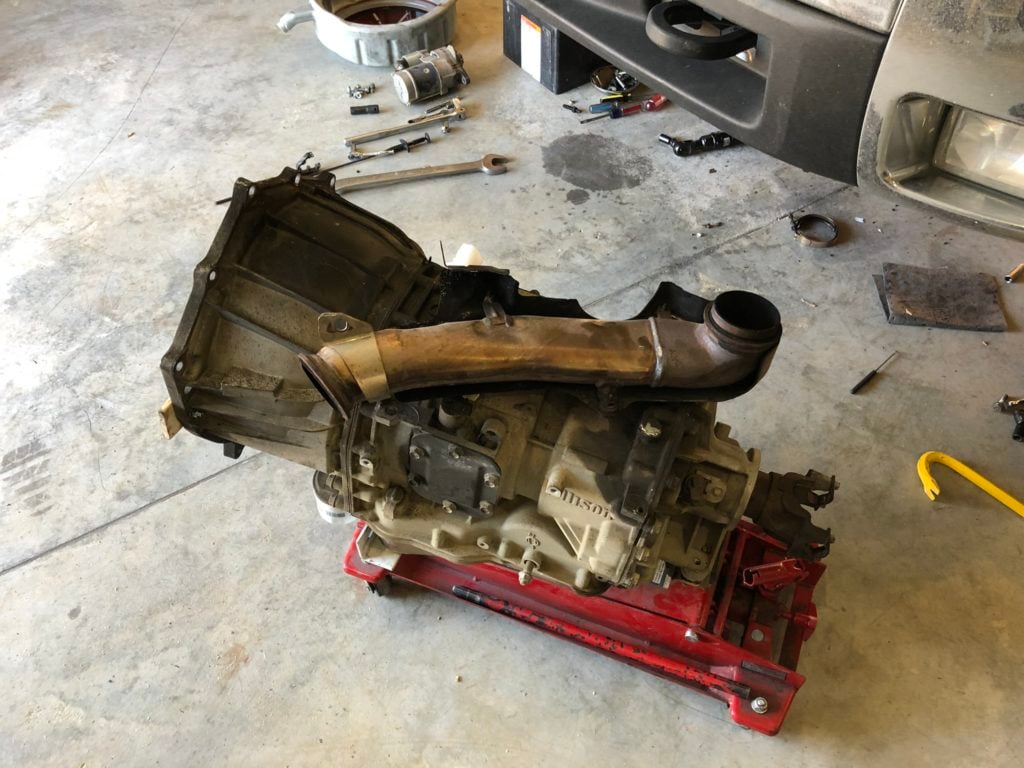
One of the most restrictive parts of the factory exhaust on the Duramax are the manifolds. The stock parts look like they were designed by an engineer who only knew how to use right angles; the ports are very small, and there are no gradual bends, just harsh corners which restrict flow and create heat. My go-to manifold when it comes to a Duramax are the PPE Manifolds and Up-Pipes. They will create a significant reduction in exhaust drive pressure, increase turbo spool up, and they’re made from a much more durable material than stock. The outlet of the manifold is spaced further away from the cylinder head to allow for a smoother airflow transition on the rear port, and so the up pipes need to be just a hair longer than stock, but that’s OK, since the PPE up pipes included in the kit will flow 53% more air than the stock parts. All told, a new set of manifolds and up pipes are well worth the investment for the increase in horsepower, but mainly, the reduction in exhaust gas temp, and safety factor.
Turbo Time:
Once the exhaust leaves the up-pipes, the next place it goes is right into the turbo, and when you’re chasing a high-power number, the stock turbocharger is going to be a limiting factor. The turbine housing is too restrictive and will generate too much back pressure, and the compressor will reach its limit soon after. The simple fact of the matter is, the stock turbocharger needs to go. While there are tons of options out there, the correct size turbocharger will have the greatest impact on the drivability of your truck, and as such, its important you don’t go too big. As measured by the inducer on the compressor wheel, the stock turbo on a Duramax is right around 60mm, and two great choices for an upgrade would the DT Stealth 64 or Stealth 67G2 from Calibrated Power. The 64mm version is better suited to a truck that needs to tow and will have great low RPM torque and response, and the larger 67mm turbo works well when higher peak power is the ultimate goal, but both will be at home on a daily driven street truck. Both are based on a stock Garrett turbocharger, and retain the functionality of the VGT which gives a broader powerband over a fixed vane style charger. One of the best things about the Stealth turbocharger is they have some of the widest VGT vanes, which means minimal backpressure in the turbine. With a larger exhaust housing and wheel, it also means you have more “turbine horsepower” so you can spin a bigger compressor wheel and force more fresh air into the engine at a cooler temperature. And the best part is, both Stealth Series turbochargers will work great in a compound setup…
Down the Pipe:
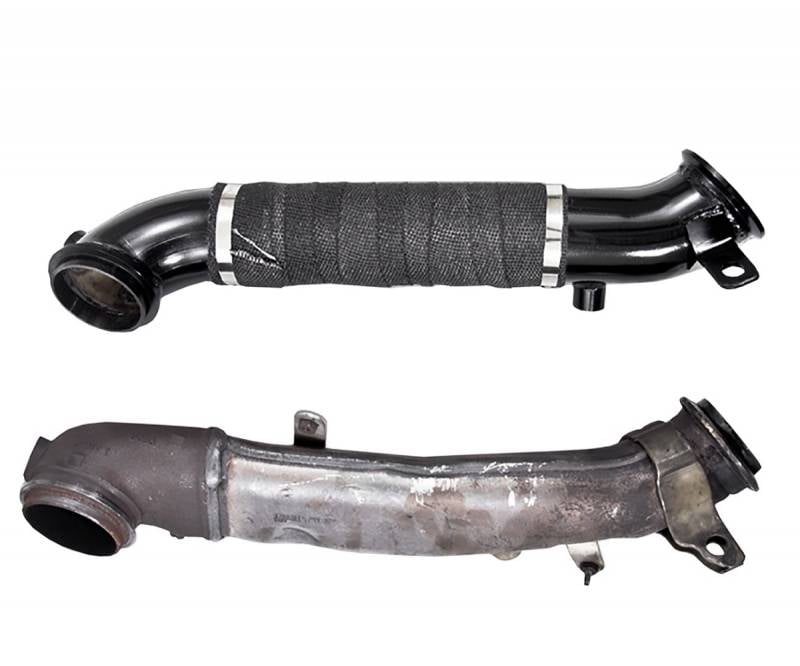
The very last part of the airflow equation is the pipe which connects to the turbo. We already took care of the majority of the exhaust with a 5” system during stage one, but now it’s time to address the down pipe. Once again, those right-angle engineers had their way, and the stock pipe has an immediate harsh bend as it exits the turbo and turns down toward the transmission, and there are several pinched off areas to make extra clearance for the transmission dip stick, heat shielding, and firewall. All in, the stock down pipe is restrictive, and does no favors for a high-performance build. It should be replaced with a 3-inch mandrel bent pipe, like the AFE Atlas Series Turbo Direct Pipe. It uses a V-band connection on each end just like the stock pipe, so it will easily connect the turbocharger to your existing exhaust system.
Fresh Air:
As far as the “cold side” of the airflow equation, the stock filter was already replaced with a cold air intake, but there is one more area which can be addressed, and that’s the intercooler. It is responsible for taking the excess heat away from the compressed air, and at an elevated power level the stock charge air cooler can become a restriction, and it will create a larger pressure drop. In short, more air enters, but not enough can exit fast enough. To cure this, a Banks Power Technicooler can be installed, and it will support a greater level of horsepower and airflow while taking more heat away from the charge air. The Banks core will flow 25% more volume than stock, and the resulting colder denser air entering the engine will lead to more power and better fuel economy as well. Top it all off with a free-flowing driver’s side Boost Tube upgrade (also from Banks) to complete the free-flowing air system which will work great with our roughly 550whp goal of stage two.
Fuel the Fire:
The very last modification for stage two is a lift pump. At our 550hp we’ll be pushing the stock CP3 pretty hard, and it won’t be able to maintain adequate fuel rail pressure. A great choice to remedy that is always the FASS Titanium Signature Series 165GPH pump. By pushing fuel toward the injection pump at 8-10 psi, the CP3 can better produce the rail pressure the tune will be commanding. The FASS pump will also clean the fuel, remove air and water, and support up to 900hp which means the same pump will work for future stages as well.
While there are some very specific parts listed here for stage two, the main goal is to address all areas of the air handling system to make them flow as efficiently as possible in order to keep the EGT’s nice any cool. While you could very easily substitute one brand for another, as long as the parts are equivalent you can expect a final horsepower number somewhere around 550 at the wheels. You will have enough airflow for at least 650, but for now the limiting factors are the injectors and CP3. Don’t forget, you’ll need some updates to your tune with all the new hard parts, but that’s as simple as a couple emails back and forth and a new EFI Live file. Remember, it is risky to run a stock sized injector with an excessively long pulsewidth, since it places too much heat on the wrong parts of the piston. Your tuner will recommend a safe stopping point on stock injectors, and let you know it’s time for larger ones. When building any diesel, it’s a much safer bet to upgrade the air side first, and then focus on the fuel system later whenever you’re ready for big power.
Stage Three, +350hp Over Stock, $10,000 Budget
Now that we have the airflow necessary to support some serious horsepower, it’s time to add the fuel to get us there, and this is where some of the more expensive parts come into play, like a set of eight injectors and a larger CP3. For me, a “stage three” diesel build takes you right up to the edge of the stock pistons and rods, and for the average Duramax, that’s right around the 650 to 700 horsepower range. Some have made more power on stock parts, and some engines have failed with less, but if you build your truck smart, then your chances of holding together (for a while) are pretty good.
Since we already installed a lift pump during stage two, we now need an injection pump which will push enough fuel to meet our goals, and the Fleece Powerflow 750 10mm stroker pump is just the ticket. It’s a direct swap from the stock pump and will maintain rail pressure past 3,000 RPM where the stock pump falls off, and the 10mm stroke will handle a maximum of 750-wheel horsepower. Next up, we need to deliver more fuel into the combustion chamber in a shorter amount of time, which means larger injectors are up on the list. For 650hp the closest size would be a set of 45% over (or 100hp) injectors, and Dynomite Diesel has what you need. They come as a set of 8 which have been flow matched to one another, and they come with a one-year unlimited mileage warranty to boot.
The stock head bolts are very robust on a Duramax, but in order to keep those gaskets sealed between the head and the block, now is the ideal time to install some head studs since you’ll be working near the valve covers to swap the injectors anyhow. A set of ARP Head Studs will provide the insurance policy you need, and unlike the stock hardware, the studs are reusable if for any reason you need to pull the heads off again.
Depending on which turbocharger you chose during the stage two build, you may be getting close to its limit, but one way to add some higher RPM power, lower EGTs, and have a wider powerband all at the same time is to install a second, larger turbocharger. The Industrial Injection Towing Compound Turbo kit makes for a very well rounded performance package, combining the best attributes of a smaller quick spooling turbo with those of a larger heavy breathing one, for cool EGTs, even when towing.
Stage Four: 1,000hp+
They say the sky is the limit for horsepower, and a Duramax is no exception to that rule. However, if you want to go further than the magic 700, you better plan on opening up your wallet. Up until this point, most of the parts selected will work independently of one another, and would work as a progressive style of build, but to push the envelope further, you almost need to start over and go big from the get-go. The turbos will need to be much larger along with the injectors and injection pump, and as such you will lose some lower RPM spool up and towing ability. Oh, and don’t forget about the rotating assembly, since the pistons and rods will all need to be swapped out, along with some trick upgrades to the valvetrain, custom tuning, camshafts, and a whole lot more. As you can imagine, the costs add up in a hurry.
Try This at Home
It’s important to remember this is not an itemized recipe; there are a lot of smaller supporting upgrades which have been omitted, along with the parts needed to make the rest of the drivetrain hold up to the increased power, like a built transmission and steering parts, gauges, miscellaneous gaskets and hardware and more. Instead, this article was designed to give you a comprehensive approach to safely building your truck up in stages, while still having a vehicle which can be driven every day without any compromises. To me, the most important thing you can take away from this is how important it is to make a plan with a realistic end goal which works with your budget. Because at the end of the day, building a diesel truck is all about having fun, and as soon as that big turbo spools up and you hear the Duramax roar, you’ll be wanting to step it up to the next stage.
Started building my first Duramax, or any diesel for that matter, almost exactly 1 year ago. Canvas, 2004 LB7 Dually EC/LB. Been learning as I got. Firstly, this is a perfect recipe, except letting people know, this is all possible for the money mentioned if you do everything yourself. I personally went with the stealth 64 for my build. Electric fans, methanol injection, both batteries relocated, race FPRV valve, with everything you have mentioned up to stage 3, and im pushing 600+HP and 1400tq to the wheels, and it is sooooo much fun to drive. Never had anything faster than a stock powered car before and im glad its a diesel truck, because not only is it a blast to drive, it is functional too. I can haul, tow and go where most cannot. Good write up and quite accurate. Thank you.
Awesome write up as I’m looking to go all at once for my 2008 LMM. Already have 3” down pipe, 5” exhaust, 165 FASS pump and AFR CAI. I’m being told a good safe upgrade is the Garrett Powermax stage 2 68mm turbo, 45% Bosch injectors and CP3 pump(not sure what size). This should get me to about 600 rwhp and using my GDP tuner run around on a mid level tune using the SOTF switch. A little worried about EGT when a few times a year I tow my 8k lb travel trailer but will use the tow mode on the SOTF and should be ok I hope. Any recommendations or advise are welcome. I just want great drive ability but nasty fun when I want. I run 37’s and lifted 6” so a load for the spooling but hope OK. Does this sound like a good reliable setup?
Hey I just read through this and noticed when you click the link for the parts a lot of them are for different year LLYs I have a 2004 will some of these parts not fit?