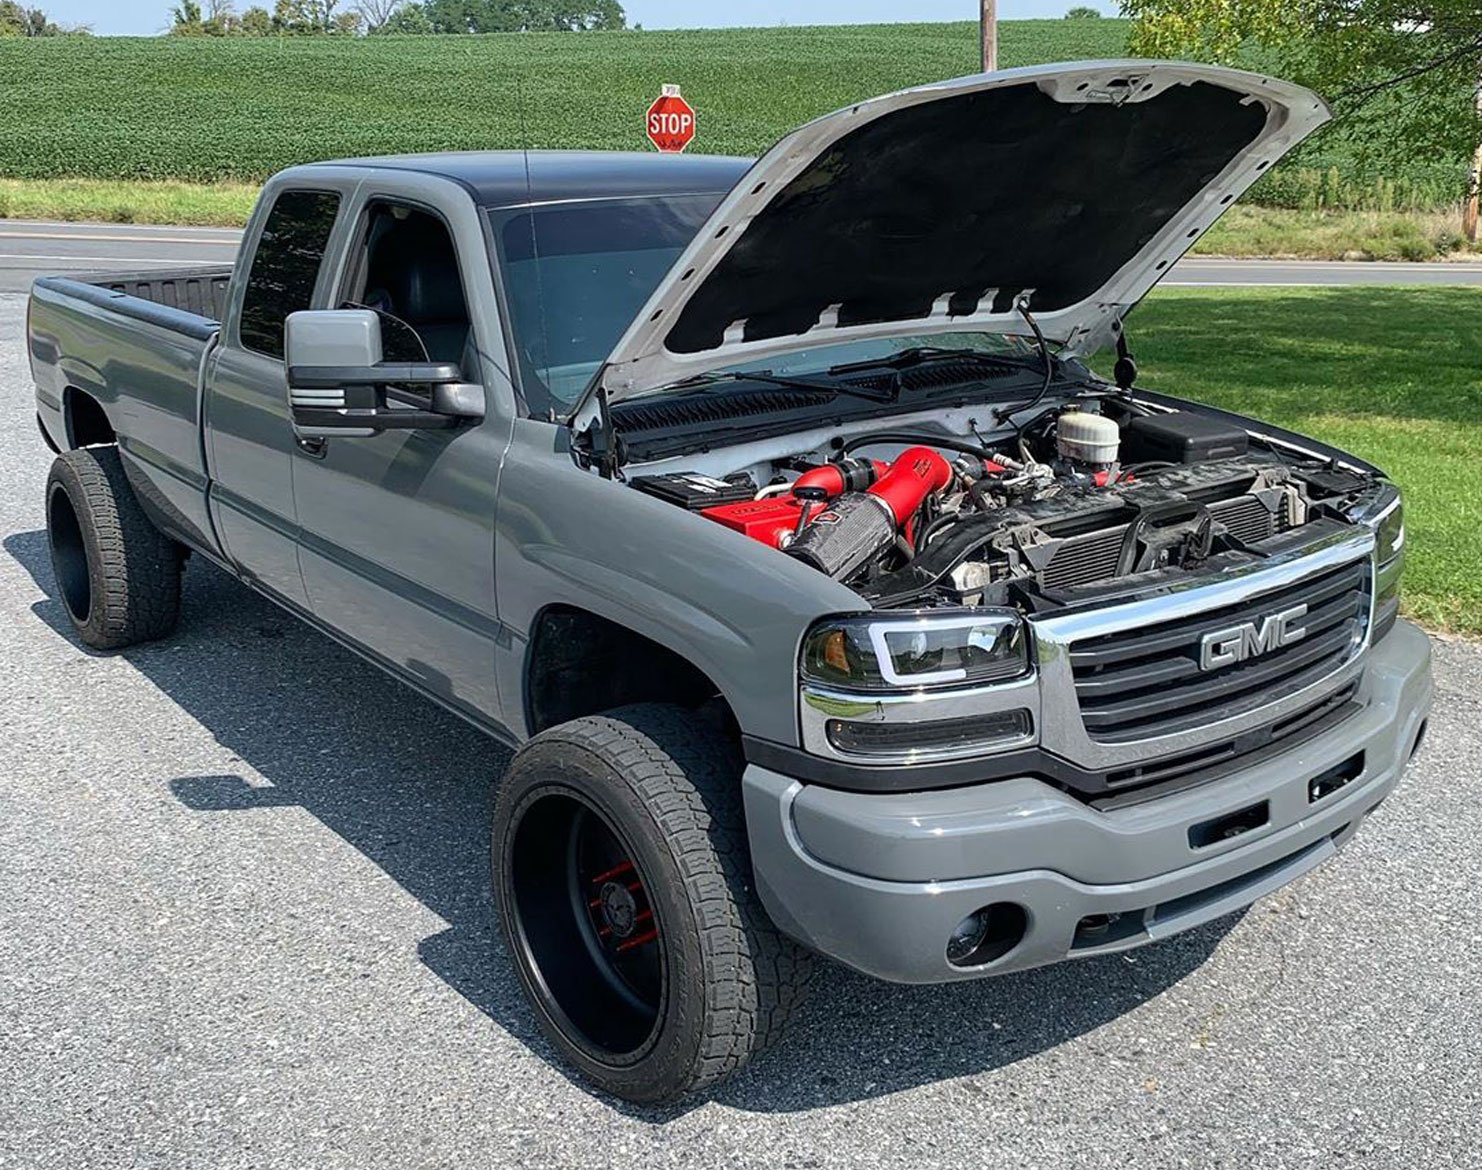
Sometimes when you’re the first to market with a new product, there are growing pains that come along with your innovative design that take a while to work through. This was exactly what happened to GM when they introduced the world’s first high-pressure common-rail direct-injected diesel engine (in a pickup truck) back in 2001. The LB7 Duramax used an innovative design to get fuel into the combustion chamber, and their R&D paved the way for Ram and Ford to follow a few years later. Unfortunately, fuel injector failure was a very common problem with the new powerplant.
If you own a 2001 to 2004 LB7 Duramax powered rig, there is a pretty good chance the injectors have already been replaced at some point, but there are still many trucks operating today that will experience injector problems. So, to help LB7 owners keep their beloved diesel on the road for another 20 years, we’re breaking down the right way to diagnose and repair failing LB7 injectors.
The First Common-Rail
Every common-rail diesel engine has the same basic parts to its fuel system, whether it’s a Cummins, Powerstroke, or Duramax. There is an injection pump which creates the high-pressure fuel, and injectors that deliver fuel directly into the combustion chamber. Between the injection pump and the injectors is a fuel rail which distributes fuel to all cylinders, and fuel flows between them through steel connector tubes. Inside the injector is a small pintle valve that opens and shuts to deliver fuel in the precise quantity, and it’s all actuated by an electrical solenoid (or by a piezoelectric crystal in later model trucks, but that’s a conversation for a different time).
The beauty of a common-rail injection system is it can atomize the fuel into a much smaller droplet, and the ECM has greater control over the timing and amount of fuel, which means more power and efficiency compared to previous injection designs. As emissions regulation increased and the consumers demand for towing power at the turn of the century, the benefit of a common-rail diesel became readily apparent. While the numbers may not seem that impressive by today’s standards, the LB7 Duramax produced a best of 300 horsepower and 520 lb.ft. of torque, which made it extremely popular with truck owners in the early 2000s.
Achilles Heel
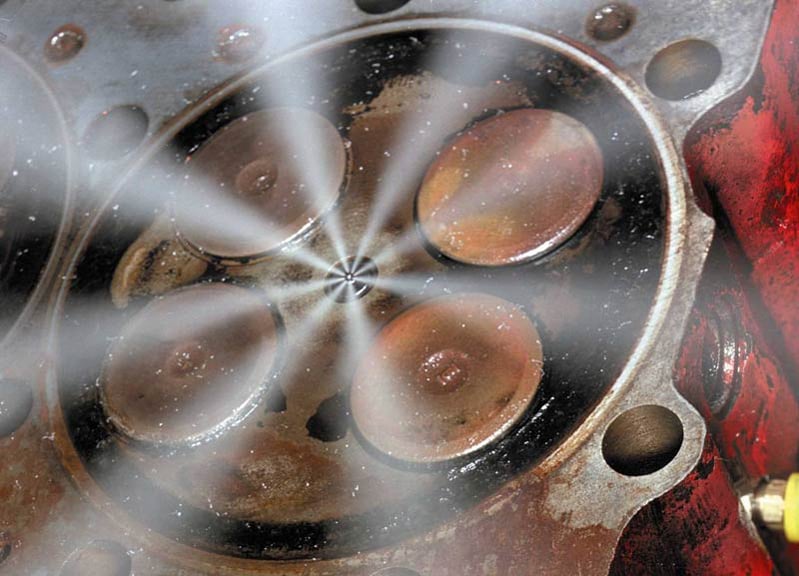
While the LB7 is a reliable powerplant, over time, it began to show its weakness. The tip of the injector sits directly inside the combustion chamber where it sees extreme temperature and pressure, and the inside of the injector sees well over 24,000 PSI of fuel, and the pintle is moving back and forth constantly, and over time these harsh conditions can cause a failure of the injectors. GM figured this out quickly, and they stood behind their product. There must have been hundreds of thousands of LB7 injectors replaced under warranty, and they even extended the coverage on LB7 injector replacement for seven years and 200,000 miles at no cost to the owner. Sadly, there are many injectors that will fail after the warranty period has expired, but thankfully there is plenty of aftermarket support for the problem.
LB7 Injector Symptoms + Diagnosis
The truth is you could toss a coin and have a fair chance of deciding that your LB7 needs a set of injectors, but there is of course a very scientific way to determine which ones are failing. The first visual clue a driver will notice will be excessive smoke from the tail pipe at idle. If you see gray smoke or “haze” from the tail pipe, that’s never a good sign you must investigate the injectors further. A failing LB7 injector will allow excess fuel into the engine either from a leaky pintle seat or a cracked body, but in either case, that fuel can wind up where it doesn’t belong. If you notice your oil level is going up over time, that’s a dead giveaway the injectors are leaking, but usually it won’t be enough to notice on the dipstick. Instead, you can send a small sample of your engine oil to a company like Blackstone Labs, and for a couple bucks then they can confirm the presence of diesel fuel in your engine oil, as well as providing some helpful insights into the overall health of your bearings, rings, and other moving parts inside your engine.
In terms of vehicle performance, a failing injector will be hard to notice simply by driving the truck around, and it usually won’t leave you stranded. Most people will unknowingly drive a truck for a few weeks or months before realizing an injector needs to be replaced, and while its probably not the smartest move, it likely won’t cause any long-term damage to the engine. However, once you suspect an injector, it’s wise to act sooner rather than later.
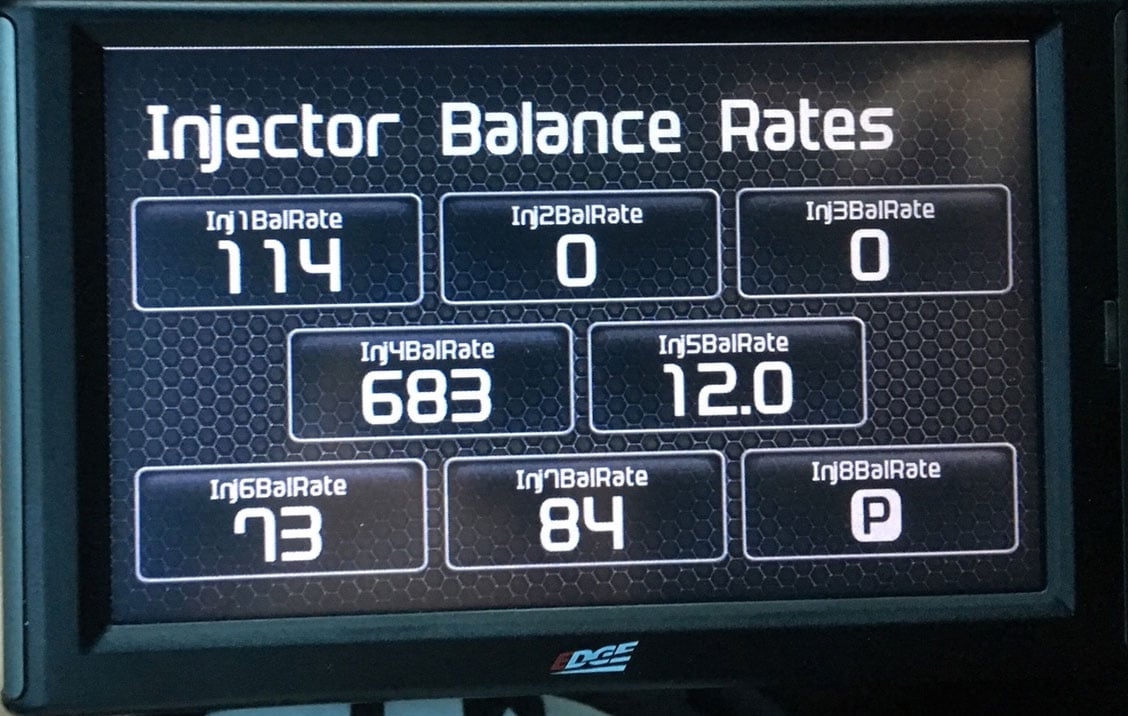
Once you’ve noticed the visual clues, it’s time to gather some more specific data to point you in the right direction. For this, you will need a scan tool or gauge monitor that can read injector balance rates. This is the ECM’s measurement of how much more or less each cylinder is contributing to the engine’s power at idle. If you have an Edge Insight CTS3 it will easily display injector balance rates, and the acceptable range to look for at idle in park is +/- 4 mm3 and +/-6 mm3 in gear at idle. If you have one or two that are outside that range along with the other visual symptoms of haze or fuel in your oil, that pretty much confirms which injector is at fault. This is usually enough evidence to support injector failure, but if you want to be certain, you can do an injector return rate test, but that is a very involved procedure. Basically, you disassemble the engine and attaching a hose to each injector return port, and accurately measuring how much fuel is returned in a specified amount of time. If it’s returning more fuel than specified, it just confirms our diagnosis.
What Parts to Install
Once you decide to bite the bullet and replace the injectors, the next logical step will be to determine what parts you’ll need to order to do the job properly. The “while you’re in there” thought process can get expensive in a hurry, but because of how deep inside the engine the injectors are buried, there will be a few required parts, a handful of suggested parts, and of course a few upgrades that can help increase the performance of the truck if you so choose.
Required Parts
The very first thing you’ll need are the fuel injectors themselves. While likely only a couple are truly bad, the others will be sure to fail in short order, so if it’s within the budget, it’s always a good idea to replace the entire set at once and save the hassle of doing the job a second or third time. Diesel Power Products sells Bosch stock replacement injectors which are a great choice if you’re not planning on adding any additional horsepower, but if you think a little more power is appealing and you want to build a hot-rod, Dynomite Diesel has a few great choices which can add 50, 75, or even 100 more horses under the hood, all while giving a bump in fuel mileage and maintaining low EGT.
The next item I would put on a required parts list for an LB7 injector job would be a complete set of fuel connector tubes. They are known to rust on the end where the line connects to the injector, and if you reuse your old tubes, some of that rust can make its way into the new injector which will damage them. A complete replacement set of lines from Industrial Injection will ensure your new injectors remain free of debris. If you skip this step and reuse your old tubes, there is a very high likelihood that your brand-new injectors will get trashed.
Suggested Parts
Next, there are several parts that are helpful and will make life easier but are not necessarily required to complete the job. The first thing I’d put on that list would be an injector installation kit from Merchant Automotive. This will get you all the seals and gaskets for every component you remove during the install. Things like valve cover grommets, return line sealing washers, and valve cover gaskets to make sure you have no fuel or oil leaks when the installation is complete.

Next, there are a few rubber hoses that connect the low-pressure fuel feed and return lines to the fuel injection control module and the filter head. As they age, the rubber hoses become brittle and can crack and leak. Since you’ll be working in the same area, it’s a good idea to swap those out as well with replacements from Merchant Automotive. Additionally, the Allen head bolts that attach the fuel return hard line directly to the injector can strip out as you remove them, so it makes sense to have a new set on hand just in case.
The final suggested part isn’t directly related to the injector replacement, but it can help your new injectors last a much longer time. Dirt, water, and air bubbles can all cause problems with diesel injectors, and your factory fuel filter can only do so much to remove them. A FASS or Airdog lift pump and filtration system will make sure the fuel is contamination free which keeps your injectors living a long and happy life, but it also helps your injection pump by delivering a steady supply of fuel.
Go-Fast Parts
The final group of parts depends on whether your long-term goals for the truck involve any high-performance upgrades. Since you’ll be deep into the engine, an injector replacement job is the perfect excuse to go a little further and install new head gaskets and ARP head studs, a new Stealth 64 turbo, PPE exhaust manifolds and up pipes, or any other parts on top of the engine that are normally difficult to access.
How to Make the Repair
If you are considering tackling this repair on your own, you’ll need a medium level of wrench turning skills, but the savings from the labor costs make it all worth it. With today’s rates, labor for an injector swap will cost somewhere between $1,000 and $1,500, and that can go a long way towards a larger turbo or a built transmission.
LB7 injectors are located underneath the valve covers, and most of the labor time is spent on simply moving other stuff out of the way to gain access to the valve covers. Start by disconnecting the battery cables from both batteries and draining the coolant. On the driver’s side of the engine, you’ll need to remove the turbo-to-intercooler charge pipe, the fuel feed and return line going to the frame, and several smaller electrical connections, along with a few mounting brackets. Next, remove the serpentine belt and unbolt the AC compressor from its mount, but leave the lines attached so you don’t blow the freon into the atmosphere. You’ll have enough flexibility with the hoses to pivot the AC compressor off to the side while you do the rest of the driver’s side.
Next, remove the thermostat housing and upper radiator hose, and that should be just about everything that’s on top of the driver’s side valve cover. Now you can remove the four fuel connector tubes with a 19mm wrench, unbolt the upper valve cover, remove the internal injector harnesses, and finally unbolt and remove the lower valve cover. This will allow you to access the fuel return line which connects the four injectors together and sends excess fuel back to the tank. Finally remove each hold down bolt and pull the injector from the cylinder head. This may prove difficult as carbon buildup inside the engine can make them stick, but with persistence they’ll come out. If they are really stuck, sometimes the injector cup will come out of the head as well, but since you’ve drained the coolant already, this will prevent the cylinder from filling with water. If the cup does come out though, you should replace it with a new one and a new set of O-rings. Much like the injectors, its cheap insurance to do the whole set of eight.
Now, it’s time to clean up all the parts that are going back on the engine like the valve covers and return lines, make sure the holes in heads are clean, ensure all the copper injector washers are out of the head, and begin assembly. The new injectors will easily slide into place, but make sure you use new o-rings and copper washers. Torque the hold down bolts to spec, throw on the fuel return line with new washers and bolts if you have ‘em, and reinstall the rest of the parts you removed.
On the passenger side of the engine, there are a few parts in the way that will need to be moved to access the valve cover. First is the intercooler-to-Y-bridge tube, the air filter and intake, the fuel filter head/mount, the engine wiring harness, the FICM (fuel injection control module) which has fuel running through it, and several more brackets. Once you have all that out of the way, the job is the same as on the driver’s side. When all eight injectors are in place and the engine is put back together, top it off with coolant, change the engine oil (in case it was diluted with fuel), throw on a new oil filter, and fire it up and do a leak check. Your balance and fuel return rates should be well within spec, the engine should run smoothly with no smoke, and your Duramax will be good to go for another hundred thousand miles.
Always Choose to Do It Yourself
Like a lot of automotive jobs, an LB7 injector replacement is time consuming, but not necessarily difficult. Most of the work is just getting access to the injectors, and it normally won’t involve many specialized tools other than a torque wrench or fuel line disconnect tool. On average, it will take between 12 and 14 hours to complete the job, so it’s doable on a weekend if you’re ambitious. But, even if you elect to have a shop perform the dirty work, you will at least be aware of the process to diagnose the problem and make the repair.
Very good and timely I might add.
I’m in that exact conundrum at this time. I’m no stranger to the tools just the diesel engine. So I’m on the line to take it on. Ordered the ’03 lb7 in August of 2002, arrived in December. Only driver, no major issues to date. Dealer replaced injectors at 80k miles. Today the odometer reads 180,000 and smokes a bit. A little embarrassing stopped in traffic though. I love my stock truck.
Thanks for the read and supliers.
Cool to hear you’re the original owner of the truck. Thanks so much for the comment and please don’t hesitate to ever reach out to us if you run into any questions.
Guys, who offers the best manual for the LB7?
I am close to having to replace those nasty injectors. I need your help on if I should buy new heads that are not cupped? What will the new heads help the most on? My overall feeling is replace the injectors, the manifolds along with a new Garrett turbo. I appreciate anything you can help me with.. Regards, Bart
Many would argue that the Haynes Manuals are the most thorough you can get. In a perfect world, yes, you’d replace the heads with “cupless” heads to alleviate any chances of the cups cracking, thus, making the truck more reliable. Its a job you only want to do once and a great time to do it is when you’re replacing the injectors. In terms of which ones to go with, I’d recommend the ones from Fleece Performance Engineering that are built in their Freedom Racing Engines division. To better allow for some collaboration, I’m going to have one of our sales technicians shoot you an e-mail with all of the specifics!
https://www.dieselpowerproducts.com/search?q=fleece+lb7+cylinder+head